Bones' Tribes 2 Mapping Tutorial


[BACK TO MAIN]

[Download OSiRiS 341's Conversion of this tutorial to Word Doc (as of 09/06/01)]

INDEX


INTRODUCTION

There are already a lot of good tutorials out on the net, but since people keep asking me a lot of questions, I figured one more wouldn't hurt, and I could try to answer a lot of those questions here in one place.

For additional information, Tribes2Maps.com has links to a lot of the other tutorials, including the one put out by Dynamix (which is a good launching point, but is very to-the-point, and has some innacuracies, oddly enough).

Generally I feel that these tutorials can do nothing more than give you a starting point with the editor, but can't teach you mapping. You can learn the editor by reading, but only by playing and by experimenting can you learn to be a good mapper. This is because it takes creativity, and a good vision of how tribes gameplay works. These things are necessary to make a map that is creative, new, refreshing, fun, and fair/balanced. Anyone can make a rip-off of another map, or just place two bases facing each other. Making it fun, and giving it good atmosphere can be far more challenging. But no matter how creative you are, if you can't figure out the editor, you're stuck... so that's where this tutorial comes in.

This tutorial assumes you already know where the game is stored on your hard-drive, and assumes you already have working-knowledge of gameplay and how to open files etc. I can't teach you how to use your computer. :)

Just remember that the mission files (.MIS extension) can be opened in wordpad or notepad, and VL2 archives can be opened using winzip.

IMPORTANT NOTE- This tutorial covers ONLY server-side maps, since that's what I focus on. If you want to learn about terrain-editing and the like, you'll need to look elsewhere. This means that maps you make using my methods will not require the players to have copies in order to play on them. Only the server needs a copy. Even if you don't plan on sticking to server-side maps, this is a good place to start since everything here is important for making maps of ANY kind for Tribes 2. This tutorial also uses CTF as the example game-type, which is easy to work with. If you want to make maps for other game types, you can easily open up existing maps and figure out how to organize them once you've learned CTF.

This tutorial also does not cover bot-support, since that's something I haven't even bothered to look into myself.


GETTING STARTED

The first step is to be able to open the editor and to be able to move around, and do some basic things without it crashing.

Before getting started, I'd recommend binding some keys. You'll find in the editor that you can still use S,D,F,E to sideslip around, but rotating the camera is harder... So run the game, go to the keyboard setup, and you'll see that by default there are no keys assigned to pitching and rotating the camera. I'd suggest assigning the arrow keys for this.

Then on to getting started...

To start a new map, first you need to choose an existing terrain (like I said in the intro, we're making only server-side maps). Once you've chosen a map that has a terrain you like, open up the base/missions.vl2 file, find that map's .MIS file and save it under base/missions (if the directory doesn't exist yet, then create it). Then, rename the file to the name you want (or just a temporary name). Open up the .MIS file in a text editor, and see if one of the first few lines is a "DisplayName=" line. If there isn't one, don't worry about it for now. If there is, change it to match the name you want. Also, change the "MissionTypes=" line to be the type you want. For instance, if this is to be a CTF map, make it "CTF". Save your changes, and exit the text editor.

Now you're ready to begin. Run the game. With the current version, chances are you'll get a UE every time you attempt to place a building ('interior'). Not everyone has this problem. If you don't have the problem, the Interiors will be placed and appear entirely black until you hit the "relight" button. If you DO have the problem, you'll get a UE. Here's how to get around it:

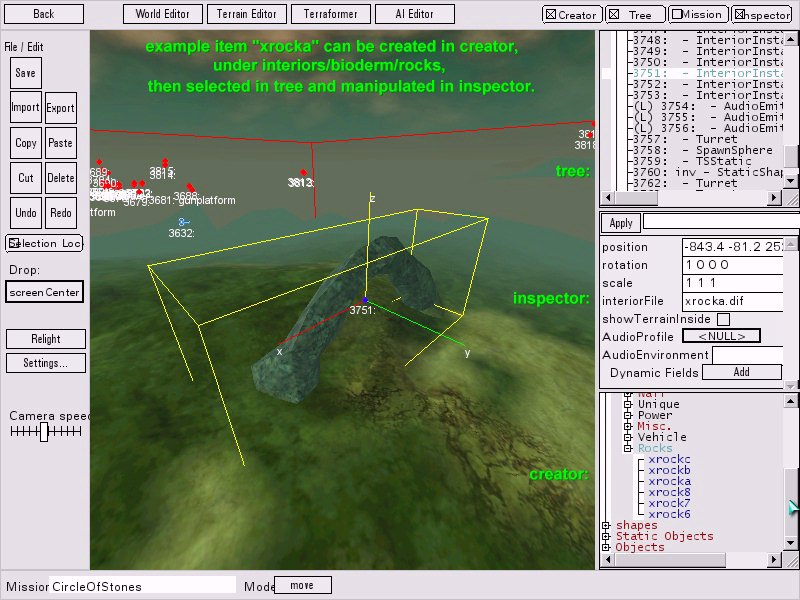
On the left, you'll see a drop-down menu called "DROP". Select "to ground". Then turn your view so you're looking straight up at the sky. Select your interior. It'll be placed, but outside your view. Click "Relight", and then you can now turn around and look at your new interior. Then you can switch "Drop" back to "Camera center" or whatever you want for placing other objects.

Before map editing, I'd recommend setting the screen resolution higher than you normally play at. I've found 1280x1024 to be comfortable for editing. It allows you to see more on the menus, as well as more details in the world-view... and since you don't have players running around doing things, it's not as slow as trying to play at that resolution.

Go to "Host" in the Game menu, select the map, and enter a password just to make sure no one can log in while you're editing.

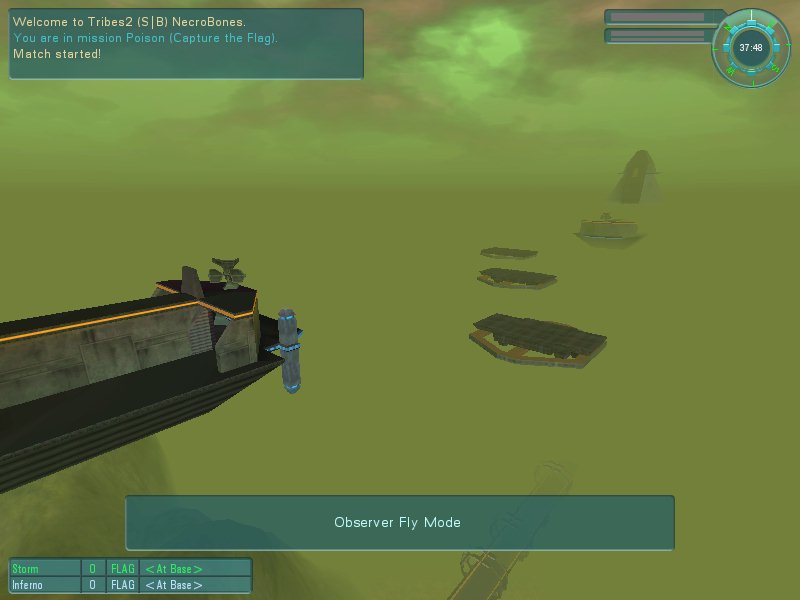
If you set your map to CTF, you'll find it in the CTF list under the name you just gave it. Load it up. Don't spawn, just stay in observer mode. Then press Alt-E to open the editor. Now you can begin making your map!


The Editor
CREATING A BASE USING THE EDITOR

After hitting Alt-E, you'll see the editor interface pop up, with a rectangular area that has a view of the world. On the left are several controls you'll rarely use, and on the right are the important windows.

On the left there are really only two things you need to mess with: Camera Speed (which sets how quickly you can move around), and the "Save" button. You'll want to save very often, since the editor is prone to crashes and some other glitches. When saving, remember to UNCHECK all but the first one, which is the mission file. If you allow it to save terrain, heightfields, etc, it'll become a client-side map. This is because server-side maps can't have custom terrain, at least for now. It's unclear as to whether Dynamix will ever include a mechanism for custom terrains to automatically transfer to players, since the terrain files are so large. For now, let's just deal with existing terrains so you can learn server-side maps, then you can dive into terrain editing later if you so choose..

To move around in the world you are editing, you can use the S,D,F,E keys as usual, and you can rotate the camera using the arrow keys as I suggested setting them up above. Or, if you want to move more freely, you can press TAB to turn off the mouse-cursor and use the mouse for free-look, and press TAB again to switch back. You'll find that it's good to set the camera speed high when you need to move around the terrain a lot, or from one base to another, but a slower camera speed is useful when navigating around inside a base.

On the right side, you can turn various menus on and off at the top. The 3 you really need are "Tree", "Inspector", and "Creator". Make sure all 3 are turned on. You can turn the 4th one (mission) off, since it just deals with the mission area and the like, which can also be dealt with manually.

Now I need to explain a little about how mission files work (and this is what the Tree window is-- A display of what's currently in the mission file).


THE TREE

In the tree, you'll see that everything contained in the mission is stored in SimGroups, which are basically folders/directories within the mission file. Some have specific purposes and MUST be present. Others can be created depending on your needs. Since you started with a pre-existing mission file, there may be some simgroups that are unnecessary, and all the necessary ones should already be present.

The most important ones are the Team simgroups. The others are all just for organizing and so forth. Under Teams, you'll see Team0, Team1, and Team2. These must be there. Teams 1 & 2 are Storm and Inferno, respectively. Team 0 has to be present, but chances are you won't put anything in it.

There must also be a simgroup for observer drop-points, which will contain cameras.

You can click on a simgroup's name to select all objects within it, and then press Ctrl-X to cut them out (they'll be save on the clipboard, if you want to paste them.. but for now we're going to just delete them). To destroy everything in the existing mission and start from scratch, select each simgroup one-by-one, and press Ctrl-X. Don't delete things like "terrain" and "sky" and "sun" and so forth, since these are necessary objects, and thus don't fall under a simgroup. Since we're starting our mission from scratch, go ahead and empty out all the simgroups now.

POOF, all gone!

If you look around, you'll see that all the plants, buidlings, etc, have all vanished, leaving empty terrain. (Note- you may still see tags floating around in space for AI objectives for the bots. I usually delete these manually out of the MIS file, but I presume there's a way in the AI editor too.. I may add more detail on this as I experiment myself). Now look where the buildings used to be. You'll see shadows left there. Don't worry about this, since a "relight" is done every time the map loads, so it won't be there next time. It's also possible that you'll see holes in the terrain where the buildings used to sit. We'll fix that later too (there are multiple ways to deal with this, and you only need to do it now if you plan to put things here, but since you're making a "creative" map, I'm assuming you don't want it to be quite so obvious that you ripped the terrain from a base map, and thus I'm hoping you'll build somewhere else on the terrain).


Sky Object
THE INSPECTOR

OK, let's take a look at how the inspector works. You'll see in the Tree window that there are some objects that define the sun, sky, terrain, and possibly water. There's also a mission area/center datablock, and maybe one or two others. Click on the sky object. You'll notice that the inspector now displays a bunch of variables and values for the Sky. There's information about background color, fog color, visible distance, haze distance, fog layers, textures, etc. I'll go into more detail later about how to make changes to the sky, but for now I want you to see how the inspector works, so I'll use it as an example.

If you want to change a variable in the object, you have to enter the new value and then press apply. For instance, as an example, change the visible distance to 200 and the haze distance to 50. Hit "Apply", and in your world-view you'll see that you can no longer see vey far, and it looks like you're in a thick fog. Change the visible distance to 1000 and the haze/fog distance to 900, hit apply, and you'll see that now you can see very far with clarity. This is how the inspector works. You can set objects to specific locations by changing it's coordinates in this way, scale objects, and change some of the behaviours and details about some of the items you'll place in the world.


THE CREATOR

Now we'll deal with the Creator window. This is how you add objects to the world. You'll find that this is sufficient for most things, but some things will be easier to do manually in the .MIS file (like adding water or fireballs... since water is a pain to create in the editor, and fireballs aren't even on the menu).

Everything is divided into 4 folders. 'Interiors' are things like buildings, bridges, and any other man-made structures.. But it also includes rocks. 'Shapes' includes things that are more dynamic in nature, such as turrets, stations, generators, packs, ammo, and even vehicles. 'Statics' have non-movable objects, like trees and plants, and 'plugs' (useful rectangular gratings that you can use to block off doorways and the like to control where players can and can't go). The 4th folder "Objects" contains things like forcefields, simgroups, observer cameras, and things of that nature.

If you're running a current version of the game (as of this writing) instead of the CD version, any time you click on an 'Interior' here to place it, the game will crash with a UE ("Unhandled Exception"). But everything else should work.

Basically how things work is that you just click on the name of an object in these menus, and that object will be created where you're looking in the world-view. This will usually be on the ground, but objects can be created on top of each other. Unlike in Tribes 1, if you're inside a building and want to create something on the floor, the object will appear outside. T1 would create it on the floor, but T2 doesn't work that way, whch is annoying since you have to take the time to carefully move the object into place.


Manipulating things
USING ALL THREE WINDOWS TO MAKE STUFF

Let's start with a building. Open up the Interiors folder in the Creator. Notice that the sub-folders are divided up by tribe name... each tribe is associated with a type of terrain and architecture. Let's look in the Blood Eagle (lush) folder. Open up Towers.

Before clicking on any objects, we need to decide where in the tree we want this thing to appear. To select a drop-point in the Tree, you need to use the Alt key. So open up "Teams", and Alt-Click on Team1.

Now click on one of the names while looking at a relatively level spot on the ground. POOF! It magically appears. Depending on what you selected, you probably have something that stands on the surface of the ground well, but you'll need to raise it's altitude a little (by default it'll appear partially submerged in the ground). Some buildings have sections that are meant to be underground, and thus may not have exterior textures... you'll know it when you see one, since you'll see disconnected wall pieces that don't look right from the outside. For now I'll assume you picked a completely above-ground design..

Notice that the object has a cube around it, and has lines representing the X, Y, and Z axes. Look down at the bottom of the screen, and press spacebar a few times. See how the little box down there flips between "move", "rotate", and "scale"? Select 'Move', and use the mouse to grab the "Z" axis (the one pointing up), and you can slide the tower up and down. Now select 'Rotate' and grab the same line again. Now you can turn the tower to face where you want. Now select "Scale" and do it again. Notice you can change how tall the tower is.

Now, if "Team1" isn't open in the Tree, open it and then click on the Tower object we created. Since we started with an empty mission, it should be the only thing there. It'll be labelled as "InteriorInstance". When you click on it, it's data should appear in the Inspector window. The top line next to the "Apply" button allows you to add a name for the tower so you can easily spot it in the Tree, but most of the time you may wish to leave these lines black because you have to be VERY careful with how you name things here, otherwise you can render the mission unloadable (basically never use spaces in the names, and make sure the name is something the game will never use internally for something else). For now, let's actually enter a name here. Type in "MainTower" and hit apply. You'll see that in the Tree, the name appears and you can easily spot it in the list from now on.

Also, look at the current Position line in the inspector. The three numbers are X, Y, and Z in that order.. Z is altitude, so to see how this works, add 20 to the current Z value and hit "Apply". Notice how the box and axis lines moved, but the tower didn't. This is a glitch in how the "server" and "client" portions of the game have just been put out of sync with each other. You can fix this. Grab one of the axis lines and slide it just a tad... you'll see the tower teleport over to match the box and lines. Now press Ctrl-Z to undo the slight move you just did, and the tower will now be at the coordinates you manually entered in the Inspector. If you save the mission while things are out of sync, everything will be fine since the objects will save in the their intended location, and will appear correctly next time you load the mission... but editing and making things look right while they're out of sync is difficult, so it's good to clean up after yourself every time you make a change manually in the inspector.

There are a lot more variables in the inspector that you can play with, and explaining them all is beyond the scope of this tutorial, but a lot of them are self-explanatory, and others can be experimented with. Some specific details for specific objects will be described further down however.


POWER SYSTEMS

Creating a base can be easy and tedious at the same time, or just one or the other depending on what you're trying to make. :)

The first thing I need to explain is how power-systems work. There are two ways that power can be provided to a base and its systems:

  1. SimGroup - The simgroup that it's in can have a "dynamic field" called "providespower". If this varaible exists and is non-zero in value, all objects in that group will always be powered with no way to destroy the power source.

  2. Generators - Any generator or solar-panel will power all objects within the same simgroup.

If you want the base to have destroyable generators, then click on the simgroups (including the team simgroup) and make sure they do not have a "providespower" line, and if they do, delete the line by clicking on the little square next to the variable's name.

You can do all sorts of interesting things with power systems, and I always enjoy coming up with creative multi-objective missions that make use of them. For instance, in Sarcophagus, I made a little bunker behind each base that has it's own power system. However, it also takes a feed from the main base, so as long as either generator is up, it stays powered. It's a place you can fall back to, or hide in during a flag-standoff.

Any generator or simgroup that provides power also provides power to simgroups -under- the one the power is coming from. Here's an example. Let's say you have a simgroup called "Base1" that contains a building, a generator, and some other things. Let's also say that this simgroup contains another simgroup called "Base2". Base2 contains a generator, a building, and some other things. This is very similar to what I just described with Sarcophagus above. Base1 provides power to itself. Base2 also powers itself. However, Base1 is also feeding power to Base2, but not the other way around. What this means is that Base1 will be unpowered when it's generator is down, but Base2 will have power so long as either generator stays up.

You have to keep these power systems in mind if you want to have multiple buildings that are powered off of each other, or are independant, and if you want seperate generators for forcefields, or for the turrets, or anything else.

One more thing- Power is only provided after you restart the mission. As you place your objects, they'll appear unpowered. So add everything you want, and then later you'll have to exit the mission and come back in and check that everything is being powered correctly.


Tartarus
CREATING A BASE

So now that you understand that, let's work on making an actual base on your map. First, choose a relatively flat spot on the ground. Use the creator to place a building, rotate it into position, and set its altitude so all edges of the bottom of it are in the ground. Something to keep in mind is that the terrain can interfere with the building inside. We'll check into this later. There are several ways to deal with it- 1) Let the terrain be inside, 2) cut a whole in the terrain, 3) reposition the building so that it still looks like it's properly sitting on the ground, but is high enough that none of the terrain extends inside the building. For now just get your building positioned nicely, and select it in the tree, look at it in the inspector, and CHECK the box that says something like "AllowTerrainInside" or some-such, and then hit apply. The terrain will still be invisible inside the building until you restart the mission, but if it does extend inside the building, people will be able to walk on it and get blocked by it, even if they can't see it.

Feel free to add whatever stations, turrets, sensors, and generators you want. Don't forget to assign names to them with the "name" field in the inspector, since all of them will diplay these names. For instance, if you want your generator to ba labelled "Main Generator", then set the "name" variable to be "Main". The word "Generator" is automatically appended, as is "station" and "sensor" and "turret" for those other objects. Make sure to line them up carefully. It's looks bad if an object is sunken into the ground or a wall too far, or if they float above the ground. We all leave small mistakes, but you should try to avoid making obvious ones. :)

IMPORTANT NOTE- Don't forget to add at least one repair pack somewhere. It should be in an obvious and easy-to-find location. You can add more than one if you wish, but I would recommend not putting them right next to the generator, which would make things a little too easy for the defenders.

You may or may not choose to put the objectives (flags or flipflops) in this base, which are described below. Once the base is done, you can use the mouse to draw out a rectangle in the view-window and select the entire building and everything in it (be careful not to select things -behind- the base), and then alt-click on the other team's simgroup you want their base to be in, and then go paste it somewhere and move it into position. That way you can make both teams have the same stuff, and not have to spend the time to do it by hand again.

You can also "export" what you've selecting, and "import" it again later, though I haven't really messed with this feature so I'm not sure how reliable it is.


OBJECTIVES

Now for the tricky part. Objectives.

OK, it's not really that tricky. :) If you're making a CTF map, then you need flags. Typically only one per team, but you can have more if you want, which makes for some rather wierd gameplay.

The first thing you need to do is choose a spot where the flag won't be so secure that no one can get to it, but not so exposed that it never stays on the stand either. Some people like "ski-capping", but I personally loathe it. I prefer to make my maps around teamwork, requiring players to get organized and work in groups. So I like forcefields with distant power sources, enclosed rooms with multiple entrances, and ledges that are too high to ski through.

Once you've chosen the spot, place a flagstand. I think they're under "Statics", in "objectives". There are two flagstands- Interior, and Exterior. The only difference is the size and appearance, so you can use either one depending on how much space you have to work with and which will look better. Then all you need to do is place the flag on top of it. These two objects should of course be in the appropriate team's simgroup.

The flag will automatically create a waypoint that both teams can see. If you want additional waypoints to appear for other buildings and locations, then at that location place a "waypoint" from the "shapes/misc" category. Give it a name using the "name" line, and that name will appear in everyone's HUD.

If you want to create capturable objectives, that's pretty easy too. Basically each additional building that is not on one team or the other should get its own simgroup. Some people put these groups under Team0, but I prefer to give them their own groups at the top-level. Once you've created the tower, or bunker, or whatever it is... all you need to do is place a "flipflop" in an accessible location in the capturable building. But you're not done- The flipflop needs to be configured. There are two things you need to worry about. First, make sure it's not on a team. It should have a variable called "Team", so make sure this is set to "0" or else one team will already own the objective at the start of the mission. Secondly, the objective needs a name so that you don't see messages like "so-and-so claimed 0 for your team". Your building shouldn't be called "0". :) To do this you need to ADD a variable in the inspector, since just like in Tribes1 Dynamix neglected to add the variable by default. But unlike T1, we can add this in the editor. In the inspector, click on the "Add Dynamic Field" button, and create a field named "name" with a value set to whatever you want the objective to be named, such as "Center Tower", or "Defense Platform" or whatever. Then you're done!


VEHICLE PADS

Vehicle pads are usually pretty easy to work with, but they have their quirks. You can place them and manipulate them like any other object, but there are some things to just keep in mind while working with them:

Also, sometimes you'll create one with a bizarre glitch where you face backwards on the vehicle station, and anything you make blows up immediately upon creation. When this happens, all you can do is delete the pad and try making it again. I've also found that in some cases if you spin it around 360 degrees and save it again it will work.

If you want to restrict the purchase of certain vehicles from the pad, you need to add dynamic fields for each one. For instance, to disallow gravbikes, you need to add a variable called "scoutvehicle" and set it's value to "removed". The variables you can use are "scoutVehicle", "scoutFlyer", "bomberFlyer", "HAPCFlyer", "assaultvehicle", and "mobilebasevehicle".

If you'd like to control the number of each type of vehicle that each team can have, you'll need to open up the MIS file and add lines at the end of it, outside of any data block, that look something like this:

$VehicleMax[ScoutFlyer] = 6;

The example above will allow both teams to each purchase up to 6 shrikes at a time. No more, no less. The variable names you can use are the same ones as above for removing the vehicles from the pad altogether. I'm just sorry that I discovered this after making some of my best heavily vehicle-centric missions.. But we live and learn, right? :)


ENVIRONMENT AND WEATHER

This is the fun stuff. :) You can adjust the sky, fog, water, and sun to your heart's desire, and the systems is remarkably flexible, even compared to T1.

Let's start with the sky. To start, look through the existing maps and find a sky that is close to what you want (perhaps it has clouds you like). You can manually copy the sky block out of the MIS file and replace the one in your mission. Or, you can wite down the name of the dml object and copy it into the appropriate field, but the editor tends to not be fond of making such changes while running.

Hostility
There are several important things in the sky to consider. For instance, the background texture can be turned off by the client (as well as the clouds), as a performance option, so always remember to pick a background color that looks good on your map. You can check a box to turn off the background texture in the inspector to see how it looks. You might even choose to leave it that way, since just a backgroun color with clouds can make for a very customizable sky. That's how I did the red and green skies in Hostility and Poison, repsectively. There are also fields in the sky block that control visible distance and haze distance. Haze distance is the distance at which the haze begins. Between that distance and the vis distance, objects and terrain will fade towards the fog color, which should closely match the predominant colors in the sky (with or without the textures). If they don't match, that can be OK too, but things will look out of place if you don't put in a thick fog layer.

The sky also controls fog layers. You can have 3 layers. "0 0 0" means the layer is turned off. The first number is the fog distance, the second is bottom of the layer (altitude), and the third is the top of the layer. Layers should never overlap, but they can be used together to make a gradual dropoff in the fog. For instance, if you set them as "100 0 100", "200 100 110", and "300 110 120", the fog will be at altitude 120 and down, but there will be multiple steps in how visually obscuring it is. You'll need to choose fog thicknesses and colors that work well. Unfortunately sometimes the terrain textures are still visible in the fog as a slightly different color because of limitations of the engine, and so certain colors will work well and others won't. You should also be sure to pick colors that look realistic and appropriate. For instance, the fog and sky in both Hostility and Poison (red and green, repsectively) are technically primary colors, but they're not pure primary colors. Making the colors realistic means having a good combination of red, green, and blue and not just a pure red, for instance. This will take some experimenting, and often you'll find that a simple grey of "0.3 0.3 0.3" will work well.
Poison

Next you'll want to play with the Sun object. You probably only need to deal with "color" and "ambient". The color determines how things are lit outdoors. Usually you want a grey/white sunlight, so the red/green/blue components should usually be equal. However, if you make a map with unusally colored sky or fog, or it's a completely underwater map, you may want to mess with the color balance of the light. Generally a sunny desert might be "1 1 1" or "0.9 0.9 0.9", and a murky forest might be a little darker, like "0.7 0.7 0.7". Likewise you need to control the "ambient" light as well, which is how things are lit in the shadows. If it's very foggy mission (kine like Quagmire) the "color" and "ambient" variables should be similar. Maybe "0.7 0.7 0.7" and "0.6 0.6 0.6". If it's sunny, you want sharp shadows, so they should be more different. If it's night, or somehow underground, you may want it all to appear as ambient light, and so you might set the numbers equal. Again, you'll have to play with it. The editor often doesn't show these things correctly, and a relight doesn't always help. The best way to check your changes is to save, exit, and reload the mission and try walking around.

For water or lava, the easiest way to add them is not to use the menu options, but rather to exit out and copy the appropriate waterblock from a mission's MIS file that has the kind of water/lava you want. Then in the editor you can change the altitude, wave intensity, opacity, and the like to suit your tastes.

Fireballs also need to be copied from another MIS file, since they don't exist in the menus.

Rain, snow, and lightning are easy to add from the menus, and have a few variables to control intensity and the like. For Lightning in particular, you need to position the object around the center of the map and set a scale that will allow strikes all over the mission area, and set a "strikes per minute" that suits your taste.

You can also copy existing sound-emitters. This is easier than creating your own, and then you can manually adjust radius, position, volume, and even change the filename of the WAV it plays... and also set repeat times. The "is3D" line basically tells the game whether to play the sound in a 3D fashion (meaning it's coming from a specific place) or as an ambient sound you always hear (like wind). The "outsideambient" variable defines whether the sound should be cut off or not when you go indoors. Min and max looping times are defined in milliseconds.


SPAWNSPHERES

Spawnspheres are wonderful in concept, and can make things much easier than placing individual spawnpoints like you had to do in T1. They do have problems though.

Basically what you do is place one or more spawnspheres for each team. These determine where you spawn at the beginning of the mission and each time you die. The sphere has several fields you need to deal with. "weight" determines how likely you are to spawn at this sphere relative to the others. If all spheres on a team have the same weight, you're just as likely to appear at each one. If one has twice the weight, you're twice as likely to spawn there. You also have indoor/outdoor weights. These determine how likely you are to spawn indoors or outdoors within the sphere. The defaults work very well if you are just using once sphere centered on a single base, but there are occasions when you need more control over it.

Once you've placed the spheres, you need to build the spawn graph. This can be done in the editor, but I don't trust the graphical version as much, and you need to exit out of the game and restart anyway before you can test the changes, so I recommend ssaving and exiting when you've placed your spheres. Then go to the windows Start menu and select "Run", and use a command line to build your mission's spawngraph:

C:\dynamix\tribes2\gamedata\tribes2e.exe -spnBuild missionfilename CTF

Obviously you need to replace "missionfilename" with the filename of your mission. This is a -slow- process. On my 1.33GHZ Thunderbird, this often takes 5 minutes or more, and I've seen it take nearly 20. It will appear to lock-up, but it's still going. When it's done, you can run Tribes2 again, but remember to go to the server settings and turn off the "dedicated" button, since running it on the command-line like that flipped it to dedicated mode.

Now you need to test if both teams are spawning correctly. Spawn a few times on each team. If you keep spawning at the center of the map, or both teams spawn from the same base, then something went wrong. Make sure all the spawnspheres are in their repsective team's simgroups. If they are, then it might have been the dreaded spawnsphere bug.

The best way to get around the spawn bug is this.. Make a second copy of your mission, but delete EVERYTHING out of the simgroups except the spawnspheres and buildings, and maybe one or two of the larger objects (like the generators). Run the spawnbuild on this, and then rename the resuting .SPN file in the base/terrains directory so that it'll be used with the real version of your map. And then go in and test it again. If it didn't work, delete the large objects too, and just leave the buildings and spawnspheres. Basically the spawngraphs sometimes screw up with large amounts of objects, or just objects in certain places. It's possible that after doing this work-around that sometimes people will spawn inside something, like a generator or station, but it's a small price to pay to be able to make the map playable, and realistically it doesn't seem to be that big of a problem anyway.

One thing to keep in mind though when creating your spawnspheres is that sometimes people will spawn "trapped". A good example is the underground base from Recalescence. If the spawnsphere includes the space under the grating in the flagroom, people will spawn there and be trapped. If you put interiors inside each other, it won't always block that space from being spawned into, so clogging the space isn't always sufficient to stop spawns from ocurring in such locations.


OBSERVER DROPS

Another thing you need before you're done is to add observer cameras. The cameras are under the "Objects" menu in the creator. Basically just put a whole bunch in.. place them in locations where you expect there to action, such as the flagrooms, the main bases, capturable objectives, etc. The cameras look in the direction of the green axis, so when you create one, just life it to a good altitude and rotate it so the green line points where you want it to look. You only need a handful of these. I'd say no less than 3, but usually no more than half a dozen or so. There's no harm in putting a lot though.


FINISHING TOUCHES

OK, so you've made your bases, with turrets and stations, sensors and flags... You can spawn on both teams, the fog and the sky looks good, and you have nice precipetation. So now what?

Well, here's just a few last-minute things to think about:

There's another thing you need to check. Remember when I had you click on the "show terrain inside building" checkbox for your buildings? Well, assuming you've exited and re-entered the mission, you should now be able to walk around to each building and see if there's any terrain showing inside. If so, you need to fix it. You can mass-select the building and move it, or you can leave it as-is, or you can punch holes in the terrain.

To punch holes out of the terrain, click on the terrain editor button at the top. Now you'll be able to use the rectangular cursor to select squares on the ground. Select all the terrain inside the building, and then it the "set empty" button or whatever it's called. :) Switch back to the world-editor, and then you can look around more easily. Make sure you didn't cut out terrain outside the building too, or else you may need to close the holes and do it again, or block over the empty hole outside with rocks and other junk. You may have to mess with things a bit to get it just right. An alternative to this, if you're on rough terrain and just can't get things right, is to use vehicle-pad buildings and stand your bases on those.


WALKTHROUGH, PLAYTEST, DISTRIBUTION

This is one of the most important steps. You need to at least do a walkthrough before putting the mission on a test server. You need to make sure the flags can be captured in both directions, and the power in both bases can be knocked out as planned. Also you need to make sure everything is powered, and that nothing floats above the floors. Every vehicle pad must be tested.

Once you're satisfied, let people play with the map and see what they think. Chances are they'll bitch and complain and tell you what they don't like, give you useless suggestions, and generally tell you the map stinks. Hehe! :)

Well, some people will. Others will give you constructive criticism. Playtesters are great for finding the bugs too, like turrets that never shoot, holes in the terrain you forgot to plug, and bad spawn points. Some tweaks and fixes might be necessary, but once you're satisfied that it passes the playtesting, then add a readme.txt and start distributing it.

To distribute it, there are some good sites, such as tribes2maps.com that you can send it too. Generally server admins are tough to convince to try your maps, so it's best to let them come to you.

To make the map easier to distribute and install, you can zip it up into a single file which you can then rename into a VL2 extension. For instance, for "mymission.mis", you'd make "mymission.vl2" using winzip. Make sure it contains the .MIS, and the .SPN files, and preserved the pathnames. That means in winzip, you should see the paths missions/ for the .mis, and terrains/ for the .spn, so that when the VL2 you're creating is placed in the base/ directory, that those files will pretend to be in the appropriate directories under base.

Enjoy, and congrats on the new map!

-Bones/NecroBones

[BACK TO MAIN]